Microsoft Access Database Management (ASP.NET IDE)


  • Microsoft keeps updating its products and each version is slightly different from its previous version. The instructor is tired of updating his slides to keep up with Microsoft, but you should be able to tell the differences.

  • The Visual Studio 2019 in the classroom CEC205 only accepts 2000 or 2002-2003 Access database format .mdb. The .accdb format will crash the VS. Make sure that you use the .mdb format in case you will use the CEC205 to demonstrate your exercises.
This page discusses how to use the ASP.NET IDE (Integrated Development Environment) to manage Microsoft Access databases.
  1. Check the Microsoft Access Database Help Pages.

  2. Use the Access to Build a Database and Tables.
  3. Check the page Microsoft Access Database Management.

  4. Start the Visual Studio Community.
  5. Check the ASP.NET Programming and select the following Windows options:
       Start ⇒ All Programs
             ⇒ Visual Studio 2015
  6. Create a Web Site.
  7. For example, create a web site at C:\ASP.NET-workspace\WebSite6\ .

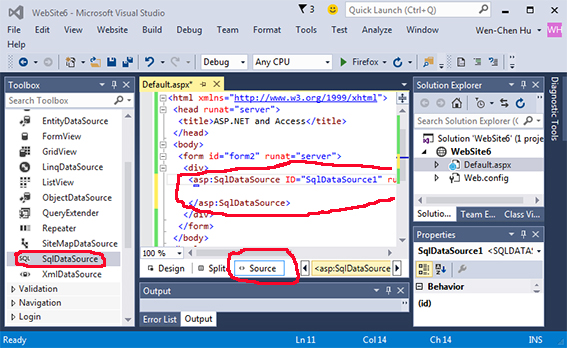
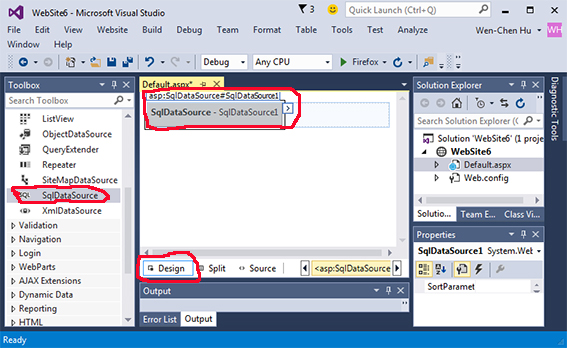
  8. Add a Tool SqlDataSourceControl on the Web Form.
  9. Click on the “Configure Data Source...” option.


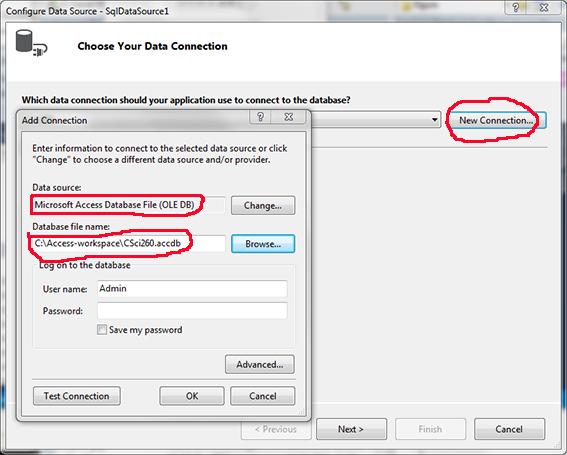
  10. Click on the New Connection button to Establish Connection.
  11. Pick the data source “Microsoft Access Database File (OLE DB)” and enter the database (file) name such as C:\Access-workspace\CSci260.accdb for my case. Once the connection is set up, you may save it for further use.


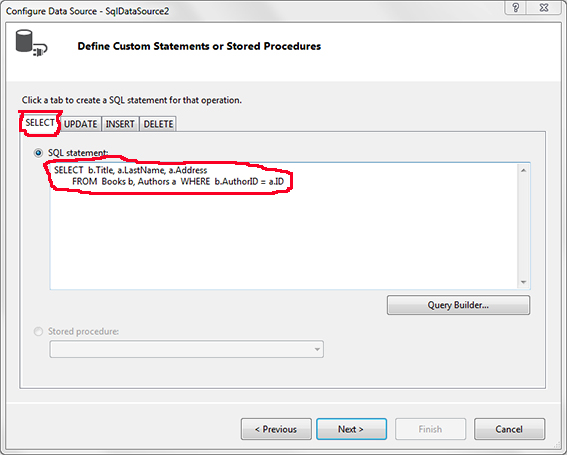
  12. Configure the SQL Statement.
  13. Two ways to specify the SQL statement:
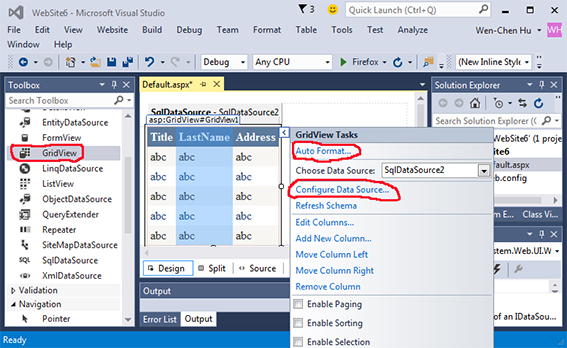
  1. Add a GridView Control on the Form.
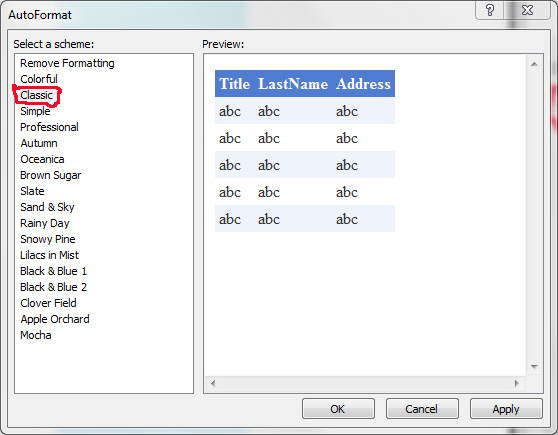
  2. Choose the data source and format the control using “Auto Format...” option:


    Connect the two data tools SqlDataSource and GridView by the following assignment:
       GridView.DataSourceID = SqlDataSource.ID
    For how to program in ASP.NET, check the ASP.NET Quickstart Tutorial, which demonstrates selected features in ASP.NET version 2.0, but they are compatible with later versions of ASP.NET as well. The source code of Default.aspx is partially, automatically generated as follows:

    C:\ASP.NET-workspace\WebSite6\WebSite6\Default.aspx
     <%@ Page Language="C#" AutoEventWireup="false" CodeFile="Default.aspx.cs" Inherits="_Default" %>
     <!DOCTYPE html>
     <html xmlns="http://www.w3.org/1999/xhtml">
      <head runat="server">
       <title>ASP.NET and Access</title>
      </head>
      <body>
       <form id="form2" runat="server">
        <div>
         <asp:SqlDataSource ID="SqlDataSource2" runat="server"
           ConnectionString="<%$ ConnectionStrings:CSci260 %>"
           ProviderName="<%$ ConnectionStrings:CSci260.ProviderName %>"
           SelectCommand="SELECT b.Title, a.LastName, a.Address
             FROM (Books b INNER JOIN Authors a ON b.AuthorID = a.ID)">
         </asp:SqlDataSource>        
                       
         <asp:GridView ID="GridView1" runat="server" 
           AutoGenerateColumns="False" CellPadding="4" 
           DataSourceID="SqlDataSource2" ForeColor="#333333" 
           GridLines="None">
          <RowStyle BackColor="#F7F6F3" ForeColor="#333333" />
          <Columns>
           <asp:BoundField DataField="Title" HeaderText="Title" 
             SortExpression="Title" />
           <asp:BoundField DataField="LastName" 
             HeaderText="LastName" SortExpression="LastName" />
           <asp:BoundField DataField="Address" 
             HeaderText="Address" SortExpression="Address" />
          </Columns>
          <FooterStyle BackColor="#5D7B9D" 
            Font-Bold="True" ForeColor="White" />
          <PagerStyle BackColor="#284775" 
            ForeColor="White" HorizontalAlign="Center" />
          <SelectedRowStyle BackColor="#E2DED6" 
            Font-Bold="True" ForeColor="#333333" />
          <HeaderStyle BackColor="#5D7B9D" Font-Bold="True"  
            ForeColor="White" />
          <EditRowStyle BackColor="#999999" />
          <AlternatingRowStyle BackColor="White" ForeColor="#284775" />
         </asp:GridView>
        </div>
       </form>
      </body>
     </html>

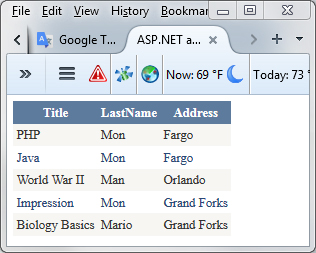
  3. Build and Debug the Web Site.
  4. Build the web site by selecting the following options:
       BUILD ⇒ Build Web Site
    If the build is successful, debug the web site by selecting the options:
       DEBUG ⇒ Start Without Debugging

  5. Launch the Web Site the Next Time.
  6. Select the options:
       File ⇒ Open
            ⇒ Project/Solution...
            ⇒ Open (C:\ASP.NET-workspace\WebSite6\WebSite6.sln)