The following acronyms will be used:
- API: Application Programming Interface,
- AVD: Android Virtual Device,
- IDE: Integrated Development Environment,
- JDK: Java Development Kit,
- JRE: Java Runtime Environment, and
- SDK: Software Development Kit.
- Showing current location using Google Maps Android API,
- Setting up Google Play services, and
- Adding SDK packages.
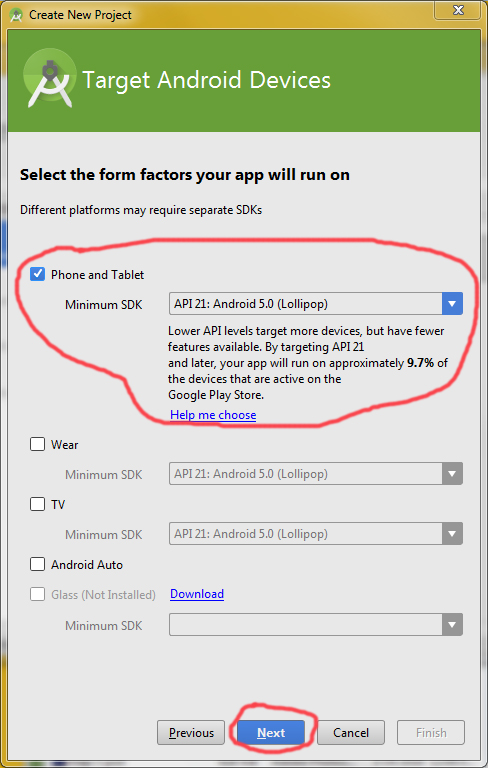
- Minimum SDK: Android 5.0 (Lollipop) and API 21 (current highest SDK Android 11.0 and API 30),
- Google Play services 8.4.0 (not installed currently), and
- AVD: 3.2" QVGA (ADP2), Android 5.1.1, and API 22.
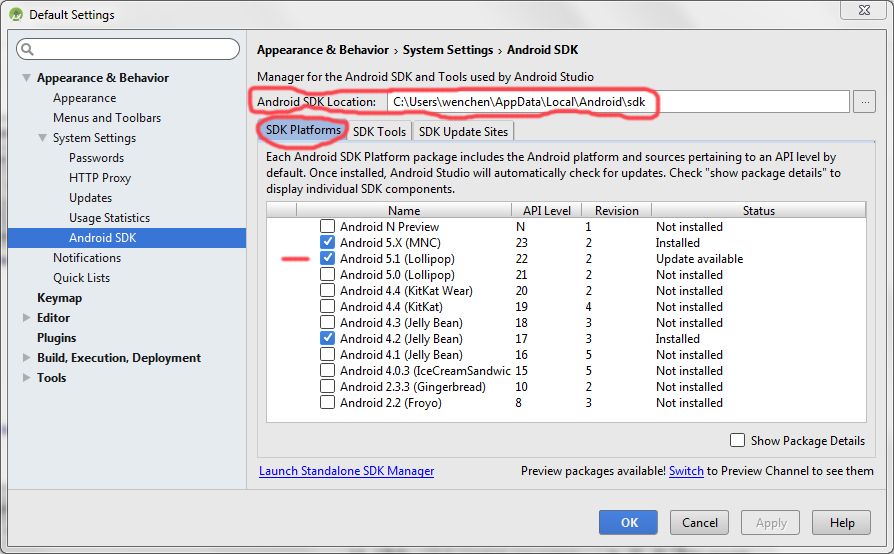
♠The latest version of Android SDK is Android 6.0.1 (Marshmallow) and API 23 as of March 2016. Android 4.2 (Jelly Bean) and API 17 seem not working for me.
♦The latest version of Google Play services is 8.4.0 as of March 2016.
♣AVD of Android 4.2.2 and API 17 does not work for me.
Installing Google Play Services SDK
By default, the Android SDK does not include everything you need to start developing. The SDK separates tools, platforms, and other components into packages you can download as needed using the Android SDK Manager. So before you can start, there are a few packages you should add to your Android SDK. To use the latest Google Play services, select the following Android Studio options:
Tools ⇒ Android ⇒ SDK Manager

As a minimum when setting up the Android SDK, the following tools and Android platform should be available:
- Android SDK Tools,
- Android SDK Platform-tools, and
- Android SDK Build-tools (highest version).
- Google Repository and
- Google Play services.

Adding Google Play Services to Your Project
Gradle is the foundation of the Android SDK build system. With Gradle, Android developers can use a simple, declarative DSL (Domain Specific Language) to configure Gradle builds supporting a wide variety of Android devices and App stores. To make the Google Play services APIs available to your app, open the
build.gradle file inside your application module directory.
Android Studio projects contain a top-level build.gradle file and a build.gradle file for each module.
Be sure to edit the file for your application module.

Add a new build rule under dependencies for the latest version of play-services. For example:
apply plugin: 'com.android.application'
    ...
  compileSdkVersion 28
    ...
  minSdkVersion 21
  targetSdkVersion 28
    ...

dependencies {
  ...
  compile 'com.google.android.gms:play-services:8.4.0'
}
|
Save the changes and click Sync Project with Gradle Files in the toolbar. You can now begin developing features with the Google Play services APIs.
Completing the Manifest File
| MapTest1/app/src/main/AndroidManifest.xml |
<?xml version="1.0" encoding="utf-8"?>
<manifest xmlns:android="http://schemas.android.com/apk/res/android"
  package="com.wenchen.maptest1"
  android:versionCode="1"
  android:versionName="1.0">

  <!-- Using Android 9.0 (API 28) -->
  <uses-sdk
    android:minSdkVersion="21"
    android:targetSdkVersion="28" />

  <!-- OpenGL ES version 2 -->
  <uses-feature
    android:glEsVersion="0x00020000"
    android:required="true" />

  <uses-permission android:name="android.permission.INTERNET" />
  <uses-permission android:name="android.permission.WRITE_EXTERNAL_STORAGE" />
  <uses-permission android:name="com.google.android.providers.gsf.permission.READ_GSERVICES" />
  <uses-permission android:name="android.permission.ACCESS_COARSE_LOCATION" />
  <uses-permission android:name="android.permission.ACCESS_FINE_LOCATION" />
  <uses-permission android:name="android.permission.ACCESS_MOCK_LOCATION" />

  <application
    android:allowBackup="true"
    android:icon="@mipmap/ic_launcher"
    android:label="@string/app_name"
    android:theme="@style/AppTheme">

    <activity
      android:name="com.wenchen.maptest1.MainActivity"
      android:label="@string/app_name">
      <intent-filter>
        <action android:name="android.intent.action.MAIN" />
        <category android:name="android.intent.category.LAUNCHER" />
      </intent-filter>
    </activity>

    <meta-data
      android:name="com.google.android.maps.v2.API_KEY"
      android:value="your_39/40-character_apikey" />
  </application>
</manifest>
|
Completing the Layout File
| MapTest1/app/src/main/res/layout/activity_main.xml |
<?xml version="1.0" encoding="utf-8"?>
<RelativeLayout xmlns:android="http://schemas.android.com/apk/res/android"
  xmlns:tools             = "http://schemas.android.com/tools"
  android:layout_width    = "match_parent"
  android:layout_height   = "match_parent"
  tools:context           = ".MainActivity">

  <fragment
    android:id            = "@+id/googleMap"
    android:layout_width  = "match_parent"
    android:layout_height = "match_parent"
    class="com.google.android.gms.maps.SupportMapFragment"
    android:layout_above  = "@+id/latlongLocation" />

  <TextView
    android:id            = "@+id/latlongLocation"
    android:layout_width  = "fill_parent"
    android:layout_height = "wrap_content"
    android:gravity       = "bottom"
    android:layout_alignParentBottom="true"
    android:background    = "#ff058fff"
    android:paddingTop    = "5dp"
    android:paddingBottom = "5dp"
    android:textColor     = "#ffffffff"
    android:paddingLeft   = "5dp"
    android:paddingRight  = "5dp" />
</RelativeLayout>
|
Completing the Java Source Code
| MapTest1/app/src/main/java/com/wenchen/maptest1/MainActivity.java |
package com.wenchen.maptest1;

import android.location.Criteria;
import android.location.Location;
import android.location.LocationListener;
import android.location.LocationManager;
import android.os.Bundle;
import androidx.fragment.app.FragmentActivity;
import android.widget.TextView;

import com.google.android.gms.common.ConnectionResult;
import com.google.android.gms.common.GooglePlayServicesUtil;
import com.google.android.gms.maps.CameraUpdateFactory;
import com.google.android.gms.maps.GoogleMap;
import com.google.android.gms.maps.SupportMapFragment;
import com.google.android.gms.maps.model.LatLng;
import com.google.android.gms.maps.model.MarkerOptions;

public class MainActivity extends FragmentActivity implements LocationListener {
  GoogleMap googleMap;

  @Override
  protected void onCreate(Bundle savedInstanceState) {
    super.onCreate(savedInstanceState);
    // Show error dialog if GoolglePlayServices not available
    if ( !isGooglePlayServicesAvailable( )) {
      finish( );
    }
    setContentView( R.layout.activity_main );
    SupportMapFragment supportMapFragment =
      (SupportMapFragment) getSupportFragmentManager( ).findFragmentById( R.id.googleMap );
    googleMap = supportMapFragment.getMap( );
    googleMap.setMyLocationEnabled( true );
    LocationManager locationManager = (LocationManager) getSystemService( LOCATION_SERVICE );
    Criteria criteria = new Criteria( );
    String bestProvider = locationManager.getBestProvider( criteria, true );
    Location location = locationManager.getLastKnownLocation( bestProvider );
    if ( location != null ) {
      onLocationChanged( location );
    }
    locationManager.requestLocationUpdates( bestProvider, 20000, 0, this );
  }

  @Override
  public void onLocationChanged( Location location ) {
    googleMap.clear( );
    TextView locationTv = (TextView) findViewById( R.id.latlongLocation );
    double latitude = location.getLatitude( );
    double longitude = location.getLongitude( );
    LatLng latLng = new LatLng( latitude, longitude );
    googleMap.addMarker( new MarkerOptions( ).position( latLng )
      .title( "Current location" )
      .snippet( "DDMS is cool." ) );
    googleMap.moveCamera( CameraUpdateFactory.newLatLngZoom( latLng, 15 ) );
    googleMap.animateCamera( CameraUpdateFactory.zoomTo(14), 2000, null );
    locationTv.setText( "Latitude:" + latitude + ", Longitude:" + longitude );
  }

  @Override
  public void onProviderDisabled( String provider ) {
    // TODO Auto-generated method stub
  }

  @Override
  public void onProviderEnabled( String provider ) {
    // TODO Auto-generated method stub
  }

  @Override
  public void onStatusChanged( String provider, int status, Bundle extras ) {
    // TODO Auto-generated method stub
  }

  private boolean isGooglePlayServicesAvailable( ) {
    int status = GooglePlayServicesUtil.isGooglePlayServicesAvailable( this );
    if ( ConnectionResult.SUCCESS == status ) {
      return true;
    } else {
      GooglePlayServicesUtil.getErrorDialog( status, this, 0 ).show( );
      return false;
    }
  }
}
|
Creating an Emulator
Select the following Android Studio options:
Tools ⇒ Android ⇒ AVD ManagerCreate one device with the following features:
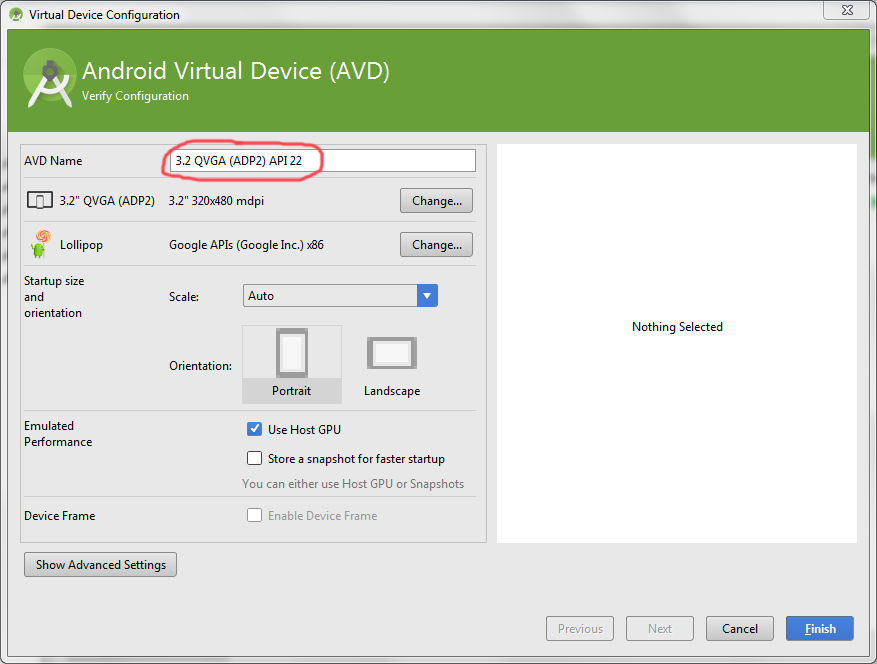
- AVD Name: 3.2 QVGA (ADP2) API 22,
- Device: 3.2" QVGA (ADP2) 320×480 mdpi, and
- Target: Android 5.1 - Google API Level 22.
Activating the DDMS (Dalvik Debug Monitor Server)
Select the following Android Studio options:
Tools ⇒ Android ⇒ Android Device Monitor

Checking the Emulator
Send the location from the DDMS and check the emulator.
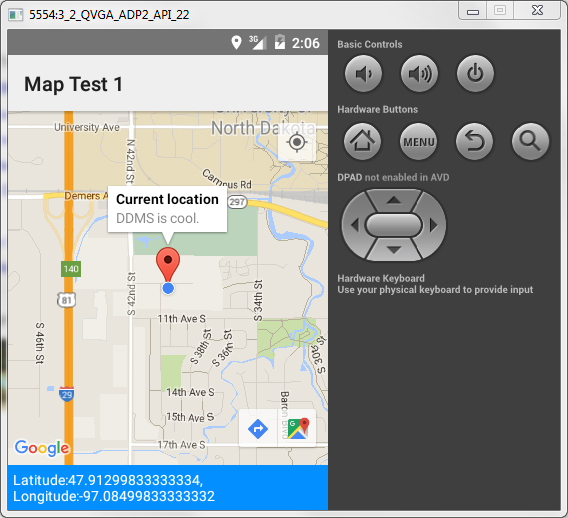
Note that
- If the map can not be retrieved (e.g., a
NullPointerException), most likely it is caused by a wrong Google API Key. For example, an invalid key was generated by using an old SHA-1 fingerprint from me (fingerprints are not unique).
- If the emulator displays “This app won’t run unless you update Google Play services,” then use an emulator with an API 21 or below.