This page discusses how to program in ASP.NET Core by using MVC (Model-View-Controller) framework and C# from the beginning. The outline is given as follows:
- Set up Visual Studio: Download and install Visual Studio (or Community), then open it.
- Create a new project: In Visual Studio, select “New Project” and choose the ASP.NET Core Web Application template.
- Choose a template: Select a template for your project, such as "Web Application" or "Web API".
- Add controllers and views: Create controllers to handle requests and views to display content.
- Run your application: Use the built-in server to run your application and view it in a web browser.
- Check the Microsoft ASP.NET Help Pages.
- Download and Install Visual Studio Community. Visual Studio is a full-featured integrated development environment (IDE) for Android, iOS, Windows, web, and cloud.
- Community: Powerful IDE, free for students, open-source contributors, and individuals,
- Professional: Professional IDE best suited to small teams, and
- Enterprise: Scalable, end-to-end solution for teams of any size.
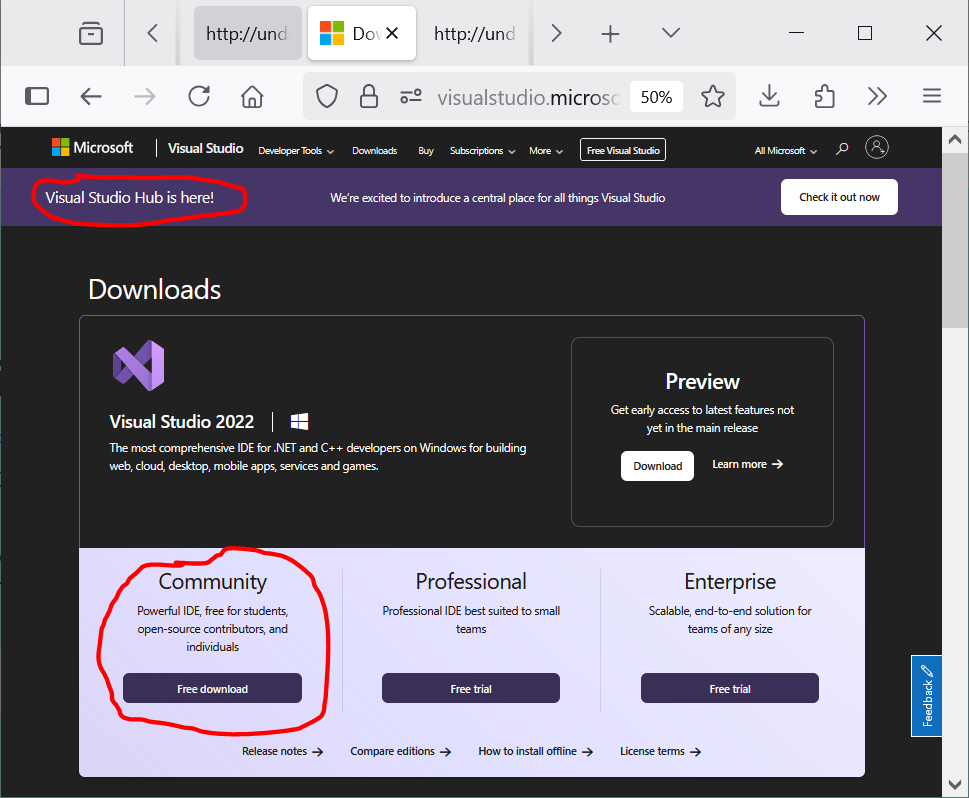
It has three editions:
Visual Studio Community, a revamped edition of Visual Studio Professional, is free for individual. VS Community is not a trial version, nor an Express-style narrowly limited product. It is the same as Visual Studio Professional, except that it does not include the CodeLens feature, and it is activated through a Microsoft account instead of a product key.

- Start the Visual Studio Community 2022. Select the following Windows options:
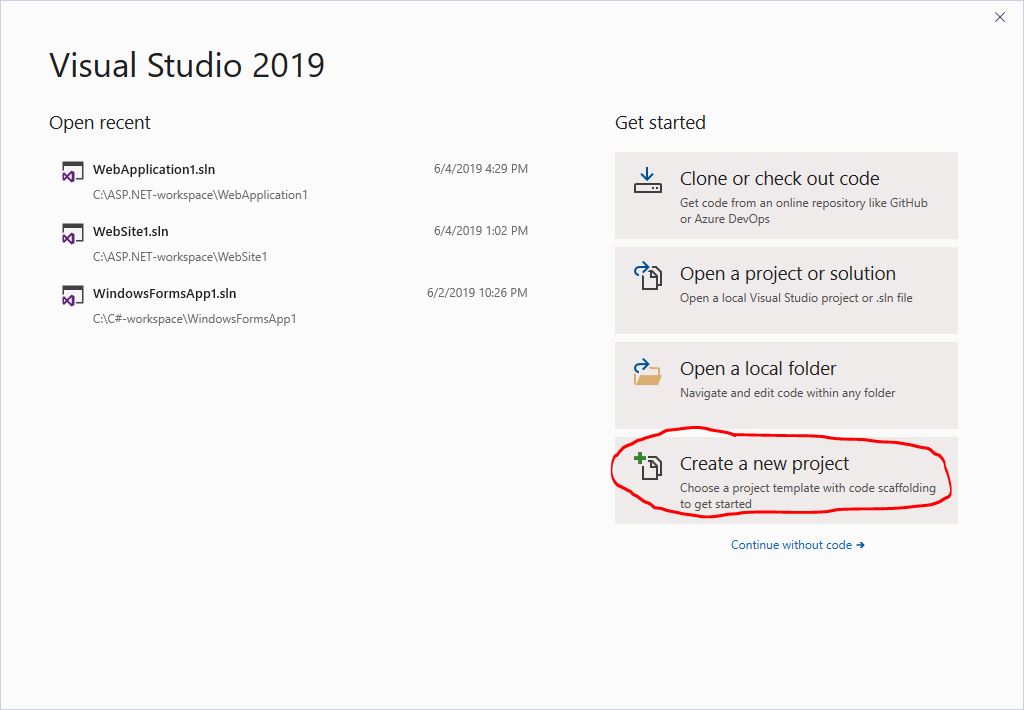
- Create a New Web Application. Follow the next steps:
- Pick the option “Create a new project:”
- Select the template “ASP.NET Core Web App (Razor Pages)” or “ASP.NET Web Application (.NET Framework):”

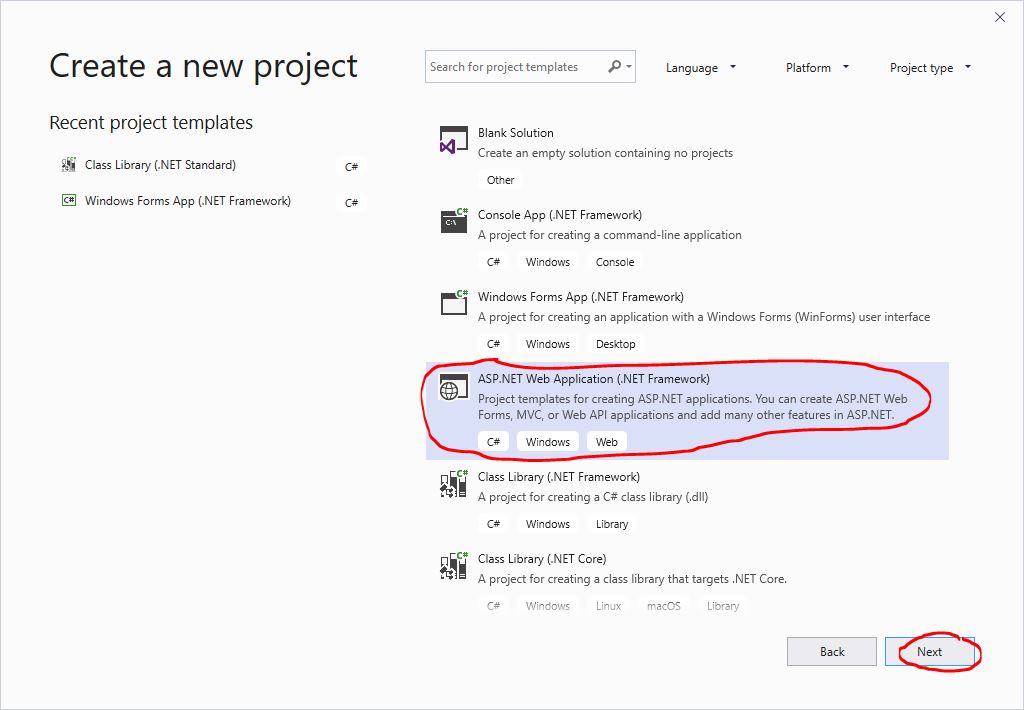
- Configure the application by entering the following information:
- Project name such as “
WebApplication1,” - Location such as “
C:\ASP.NET-workspace\,” and - Checking “Place solution and project in the same directory.”
A solution is a container for projects.
A single solution may contain zero or more projects.
Loading the solution file will load all the associated projects.
Unchecking this option puts the projects under the solution and may generate a path like “
C:\ASP.NET-workspace\WebApplication1\WebApplication1\WebForm1.aspx” instead of “
C:\ASP.NET-workspace\WebApplication1\WebForm1.aspx”. - Project name such as “
- Create a new ASP.NET web application by selecting the template “Empty” or “Web Forms:”


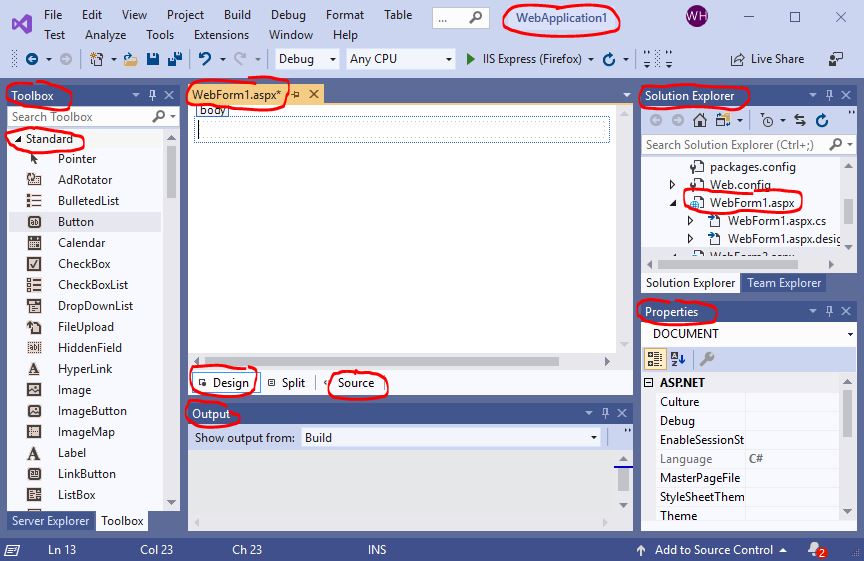
- Visual Studio IDE (integrated development environment) will be displayed as follows:

   Start ⇒ All Programs
         ⇒ Visual Studio 2022
If you want to open an existing project, pick the project with the .sln (solution) file extension as follows.
Otherwise, go to the next step.


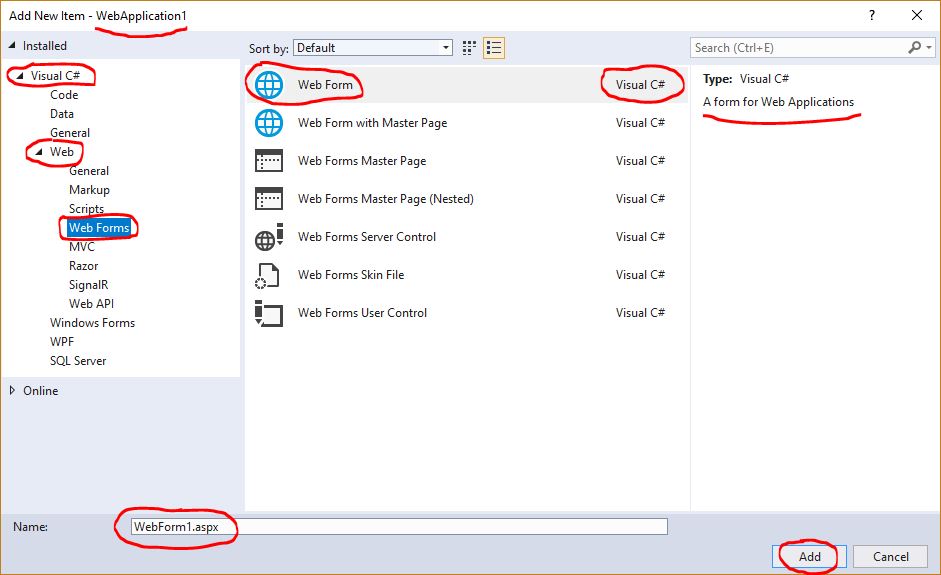
- Create a Web Page. This web application is to display the user name entered from the previous page. Take the following steps to create the first page:
- Select the options:
Project ⇒ Add New Item...
- Pick the template: “Web Form” and “Visual C#” and
- Give a name, such as “
C:\ASP.NET-workspace\WebApplication1\WebForm1.aspx”.

⇓
| In the Model-View-Controller (MVC) framework, the View handles the user interface. It displays data from the model and sends user input back to the controller. |

|
|
 @model Form_Post_MVC.Models.PersonModel
 @{ Layout = null; }

 <!DOCTYPE html>
 <html>
  <head><title>Index</title></head>
  <body>
   @using ( Html.BeginForm( "Index", "Home", FormMethod.Post ) ) {
    <table cellpadding="0" cellspacing="0">
     <tr>
      <th colspan="2" align="center">Person Details</th>
     </tr>
     <tr>
      <td>Person Id:</td>
      <td>@Html.TextBoxFor(m => m.PersonId)</td>
     </tr>
     <tr>
      <td>Name:</td>
      <td>@Html.TextBoxFor(m => m.Name)</td>
     </tr>
     <tr>
      <td>Gender:</td>
      <td>
       @Html.DropDownListFor( m => m.Gender,
        new List<SelectListItem> {
         new SelectListItem { Text="Male", Value="M" },
         new SelectListItem { Text="Female", Value="F" } },
	 "Please select" )
      </td>
     </tr>
     <tr>
      <td>City:</td>
      <td>@Html.TextBoxFor( m => m.City )</td>
     </tr>
     <tr>
      <td></td>
      <td><input type="submit" value="Submit" /></td>
     </tr>
    </table>
   }
  </body>
 </html>
|
The Model represents the data and business logic. It interacts with the database and processes information.
|
 namespace Form_Post_MVC.Models {
  public class PersonModel {
   /// <summary>
   /// Gets or sets PersonId.
   /// </summary>
   public int PersonId { get; set; }

   /// <summary>
   /// Gets or sets Name.
   /// </summary>
   public string Name { get; set; }

   /// <summary>
   /// Gets or sets Gender.
   /// </summary>
   public string Gender { get; set; }

   /// <summary>
   /// Gets or sets City.
   /// </summary>
   public string City { get; set; }
  }
 }
|
Controller: Acts as the intermediary between the model and the view. It processes user input, updates the model, and determines which view to display.
|
 using Form_Post_MVC.Models;
 using Microsoft.AspNetCore.Mvc;
 // using System.Web.Mvc;

 namespace Form_Post_MVC.Controllers {
  public class HomeController : Controller {
   // GET: Home
   public ActionResult Index( ) {
    return View( );
   }

   [HttpPost]
   public ActionResult Index( PersonModel person ) {
    int personId  = person.PersonId;
    string name   = person.Name;
    string gender = person.Gender;
    string city   = person.City;
    return View( );
   }
  }
 }
|
- Create the User Interface of the Web Form
WebForm1.aspx.
Visual Studio Community 2019 includes a WYSIWYG, drag-and-drop user interface.
Build the interface as follows:
- 1
Label, whose value of the propertyTextis “Welcome to ASP.NET!”, - 1
TextBox, whose value of the propertyIDistextBox1, and - 2
Buttons, whose values of the propertyIDarebutton1andbutton2, and values of the propertyTextareSubmitandExit, respectively.

which includes the followings tools:
The source code of
WebForm1.aspx is partially, automatically generated as follows:
C:\ASP.NET-workspace\WebApplication1\WebForm1.aspx
|
 <%@ Page Language="C#" AutoEventWireup="true"
   CodeBehind="WebForm1.aspx.cs" Inherits="WebApplication1.WebForm1" %>

 <!DOCTYPE html>
 <html xmlns="http://www.w3.org/1999/xhtml">
  <body>
   <form id="form1" runat="server">
    <div>
     <asp:Label ID="Label1" runat="server" Font-Bold="True"
       Font-Size="Large" Text="Welcome to ASP.NET!">
     </asp:Label>
     Name:
     <asp:TextBox ID="textBox1" runat="server" Width="142px">
     </asp:TextBox>
     <asp:Button ID="button1" runat="server" Text="Submit" />
    </div>
   </form>
  </body>
 </html>
|
- Implement the Web Page
WebForm1.aspx.
For how to program in ASP.NET, check the ASP.NET Tutorial.
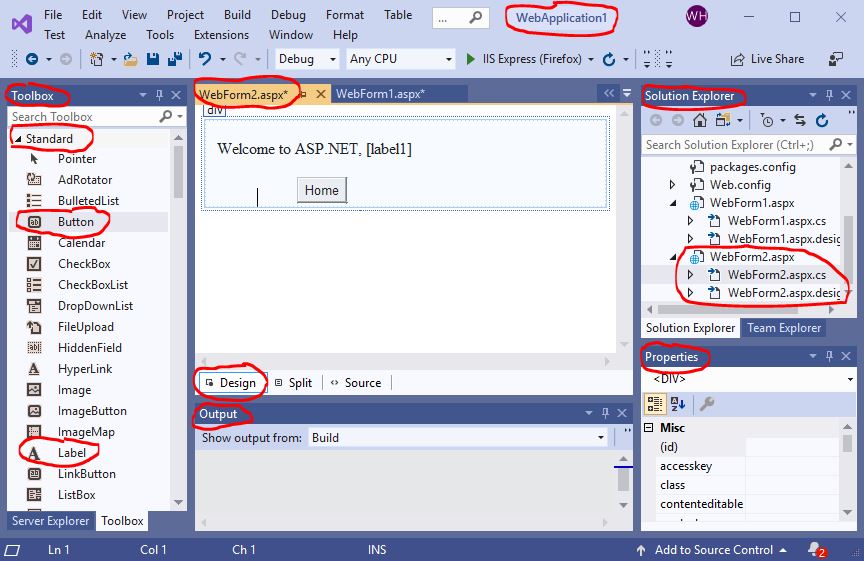
Double click the button “Submit” in the design of - Create the Web Form
WebForm2.aspx.
Build the interface as follows:
- 1
Label, whose value of the propertyNameislabel1, and - 1
Button, whose values of the propertyNameandTextarebutton1andHome, respectively.
WebForm1.aspx.
The tab WebForm1.aspx.cs of a CS template will be generated.
Complete the C# function button1_Click as follows:

 using System;

 namespace WebApplication1 {
   public partial class WebForm1 : System.Web.UI.Page {

     protected void button1_Click( object sender, EventArgs e ) {
       Response.Redirect( "WebForm2.aspx?name=" + textBox1.Text );
     }

     protected void button2_Click( object sender, EventArgs e ) {
       Response.Close( );
     }
   }
 }
which includes the following tools:
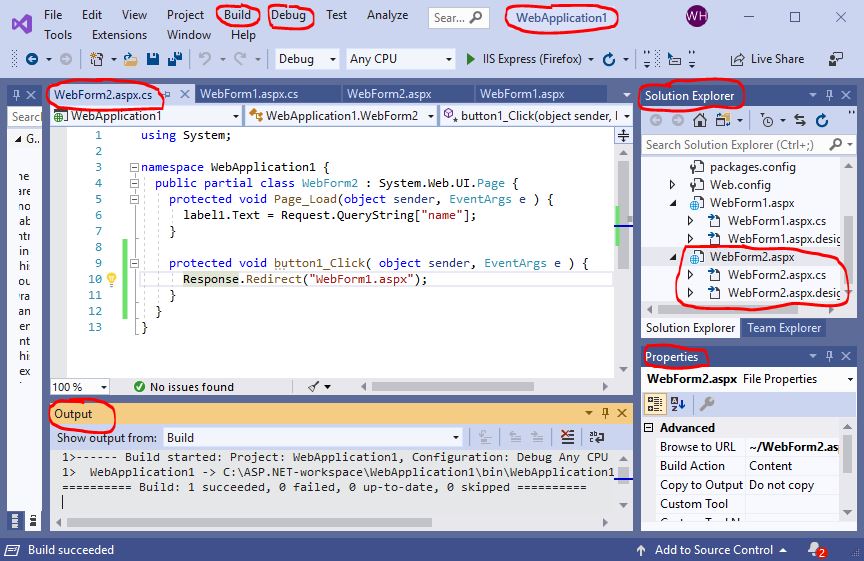
- Implement the Web Page
WebForm2.aspx.cs.
Double click the button “Home” in the design of - Build and Debug the Web Application. Build the web application by selecting the following options:
WebForm2.aspx.
The tab WebForm2.aspx.cs of a C# template will be generated.
Complete the C# functions Page_Load and button1_Click as follows:
 using System;

 namespace WebApplication1 {
   public partial class WebForm2 : System.Web.UI.Page {

     protected void Page_Load( object sender, EventArgs e ) {
       label1.Text = Request.QueryString["name"];
     }

     protected void button1_Click( object sender, EventArgs e ) {
       Response.Redirect( "WebForm1.aspx" );
    }
   }
 }
Build ⇒ Build SolutionIf the build is successful, debug the web application by selecting the options:
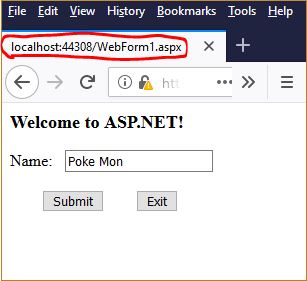
Debug ⇒ Start Without DebuggingOne example of execution results is shown as follows:
|
Submit ⇒ ⇐ Home |

|
Start testing your web site. Unless there are a web server and an IP address on your machine, the web pages can only be accessed by a browser on the local machine. You can see this by noticing the URL is, for example,
http://localhost:44308/WebForm1.aspxFor demostration, you may save the web site in a flash drive or in the cloud.